Bones from two roast chickens
The usual: garlic and onion peels, carrot ends, celery
Basil and cilantro stalks
Hot pepper tops
Green and red pepper tops, and seeds
Summer Squash ends and peels
Bay leaves from the roast chicken
Tomato ends
Chard stems
Green onion ends and tops
 |
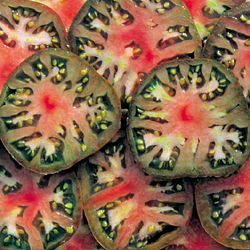
| Zapotec from White Flower Farm |
What to choose? Heirloom is a huge buzzword in certain circles, but for a good reason! Before the Beefsteak was king due to size and shippable structure, there were hundreds of different types of tomatoes in this country! Seeds would be saved and passed down within a family, keeping a particular variety alive. Not only that, the store verities are bred for very specific growing conditions(usually in CA), often leading to heartache on the part of the home gardener. If you doubt me, just take a drive around my short-summer Idaho town and see all the tomatoes that are *almost* ripe, with fall on the way. Choosing heirlooms from your area instead helps your hard work succeed!
Here are a few of the beautiful species now making a comeback!
 |
| Borsalina F-1 from Seeds of Change |
 |
| A Stripped Stuffer from the blog Gone To Seed |
 |
| Black Seaman from Seedman's |
 |
| Aunt Ruby's German Green from Swallowtail Garden Seeds |
While many stores (especially trendy ones like Trader Joe's) are trying to get in on the act by selling packs of heirloom tomatoes, don't fall for it! Just like the other tomatoes on the shelf, they will have been picked green, then ripened in the warehouse to keep them from being bruised or gotten by bugs. They will not taste as good as those grown locally by a small farmer.
 |
| Recipes from She Knows |
Category:
Colombian Exchange,
summer,
tomatoes,
Why Choose Heirloom?
3
comments

It only took a year from my first efforts and previous post, but I finally was able to go berrying yesterday! I have the family of Kjerstin, my friend (and regular commentator on here) to thank for having such a great experience: her mother has been going regularly ever since she was a little girl, and believes in sharing the experience with others.
It was a delightful experience, and, as you can see from the above, the local huckleberries look nothing like the pictures I was finding online! They're scrubby little underbrush, only about 2 feet high, which requires getting down on the ground to check for berries, since they often seem to hide under the leaves (I found myself gently bending entire little bushes over so that I could actually see what I was looking for on more then one occasion).
For those of you looking interested in trying yourselves, here are 5 simple hints:
1. Go high. You need to get up past the aspen woods to areas with pine and little forest wildflowers like globe mallow. We drove on dirt roads for quite a while up Kelly Canyon outside of Ririe, Idaho, then all bundled into a truck to take a road usually reserved for dirtbikes.
2. Practice good berrying etiquette: Jacqueline (my guide) told me that while it's fine to look for other berry pickers and seemingly abandoned cars, it's bad form to start picking where someone else is. Go farther along the road and find your own spot. Don't worry, they'll be there if you keep looking...it might take getting out of the car and poking around a bit a few times, though.
3. Right now is late in the season...but that's ok. While it's ideal to go in late July, berries don't ripen all at once. I was told that really high areas (like parts of Yellowstone) are just really getting going.
4. Use all of your senses to check for berries. After a bit, I got a pretty good idea of what Jacqueline was looking for when she got out of the truck, however getting down close to ground level, handling the berries, checking for that dark purple color, smelling them (they're more fragrant then any blueberry I've ever seen) and then tasting them when you're 99% sure is the way to go.
5. Make noise. It keeps bears away and insures that you don't get separated from your companions. The latter is shockingly easy to do when you're all kneeling and sitting in undergrowth, picking your way along where the berries take you. I was a little shocked at how I'd ranged all over the hillside. I'd gone far enough over that there were berries below me I hadn't seen on the way up.
6. Wear nothing you remotely care about, head to foot, and pack sunscreen/hats and bug repellant.
A big thank you again to Jacqueline and Eric and their great family. I will most definitely be going again, and am considering planning a camping trip next year to pick!
Category:
berries,
huckleberries,
lists,
wild gathering
1 comments
| From CarveWright.com |
Yes, you read that right. Plastic keeps my kitchen from looking suitably retro-Victorian for my taste, and so it has to go. I'm still trying to figure out exactly what that says about me as a human being.
But what should be used instead? I honestly started out having no clue...my entire life disposable plastic has been a standby in the kitchen. Many switches though are simple and easy...and are part of a scheduled overhaul in my kitchen.
Instead of plastic shopping bags:
Buy some reusable bags or baskets. I got some three years ago and while they've lost the flat bit for the bottom, otherwise they're still going strong. Because they're sturdier, the ones that are about the same size as plastic bags actually hold three plastic bags worth of groceries. The only real difficulty is making sure they make it to the store.
Or, better yet, sew your own bags. If you have old denim or odds and ends of fabric you love, this is a simple way to use them, even if you don't have the most sewing experience. I've even seen totes made out of items that would otherwise be thrown away, like crocheted grocery bags or sewn together juice pouches.
Instead of plastic containers for leftovers:
 |
| They even come in smoothie size. |
If you have small children like I do, camp plates are also your friend. They've been a staple in European nurseries for ages for a reason.
Instead of Sandwich Bags:
When packing lunches, there are a number of nice reusable lunch containers on the market. I confess, I like brown paper bags best. They can be recycled, I won't cry if they're lost or tossed instead, and they make great craft projects and incubators for pies. As for what goes in the bag, our great grandparents would have wrapped their sandwich in wax paper. That applies to other kitchen items, too...Alton Brown swears by storing cheese in waxed paper in the fridge. That way the live bacteria can still breathe.
Storage:
Glass or metal kitchen canisters have a great vintage look, and make it easier to buy in bulk. If you can't find a good set, you can get a plain glass or ceramic set and add pretty decals. I'm looking forward to an eventual new set, since mine are pretty hand me downs, but have seen better days.
 |
| Labels at The Project Girl |
There are also some ideas that can cut back on messy things headed for the trash(making it less likely you'll need plastic liners to stay sane). For example, it is simple and easy to build a compost heap if you're lucky enough to have land. By putting your biodegradable kitchen refuse (but not animal parts like bones) in a crock that gets dumped on the compost pile, you cut down on your trash, and add a lot of nutrition to the heap. Even better if it's vegetables that were used for stock, since those are already partially broken-down! Victorian kitchens also often had specialized crocks for things like a sourdough start, pickles, and sauerkraut...all of which do best at cool, but non refrigerated conditions due to their live cultures.
One other potential problem area is plastic wrap, which I personally use everywhere. Julie, at Towards Sustainability has written a great article on that issue, pointing to baking paper, foil, and cellophane as alternatives.
Anyone else have other ideas to throw my way?
Category:
aesthetics,
bread,
cookware,
Food Safety,
frugality,
gadgets,
Recycling
8
comments
Since I save bits and scraps for the stockpot all week long, sometimes remembering what is going in there is a bit of an adventure. Today, for example, I have the frozen baggy sitting here next to me, trying to remember what in the world that purple-ish vegetable skin is, or the yellow seeds...
Bones from bone-in pork chops. It would have been too messy to remove the bones first, so I saved them after the meals in question...they were frozen immediately, and then are getting boiled, so I figure that's fine.
Steak trimmings
A few shrimp tails
The usual: onion and garlic ends and skins, carrot tops, celery ends
Green pepper tops and seeds
Jalapeno tops
A few lemon halves
Eggplant tops and skin
The skin and seeds from two lovely(but huge!) yellow summer squash a friend shared with me
Zucchini tops
Lots of pea pods from some peas shared by a neighbor of my mother in law!
I love all the garden sharing that happens this time of year, don't you?
As always, seafood bits or citrus get pulled earlier then other things, to avoid off-flavors. The same might go for the pea pods, depending.
Category:
Stock
2
comments
 |
| Antique Gallery here. |
We owe a lot of our modern kitchen appliances to the Industrial Revolution. Stoves that could change temperature by the twist of a knob, potato peelers, canned foods, and cookie cutters are all products of Victorian or Edwardian ingenuity. So why isn't there more Steampunking of the kitchen going on? Sure, Steampunk Home and Kitchens.com have some great ideas for the overall kitchen area, but if I can type in a few quick keystrokes and come face to face with a beautifully steamed computer or laptop that looks like a music box, why is the same not true for some of my favorite toys?
5. The Teakettle.
 |
| Worthpoint.com |
 |
| From Craigslist for $185...talk about a bargain. |
4. The Pressure Cooker
 |
| From Modern Pressure Cookers |
 These have been around for a very long time...since the 17th Century (check out a beautiful brass and silver Appert model here). It was only in the early 20th Century that they gave up their heavy (and hopefully explosion-proof) look, with all sorts of interesting knobs and gauges and steam in exchange for the simplified light-weight versions popular for home canning. Marketing also traded in the slightly stomach churning name of "Steam Digestor"...doesn't the sound of that just make you want to rush to put its contents on your plate?
If you plan on looking for old pressure cookers, though, be careful! Given their nature, they are dangerous stuff if not calibrated properly, or if time has damaged them in some way. With those safety concerns in mind, this is one that if found might be better suited to a decoration, or becoming a component of a bigger(and low pressure) contraption. Not sure what to do with one, even if you had one? Go here!
3. The Ice Cream Maker
 |
| 1900 model from the Journal of Antiques and Collectables. |
Patent for the small-scale hand crank type goes to Nancy Johnson in 1843. According to the Journal of Antiques and Collectables, by the Civil War there were about 50 different versions of the bucket style machines, and they're still available today if you know where to look.
 |
| 5 gallon churn attached to a 1926 Hercules Engine. |
 |
| From HomeBarista.com |
1901 gave us the Tipo Gigante, a machine invented by Luigi Bezzera to use steam to force hot water through the coffee grounds, hopefully reducing the time his employees took for their coffee breaks. The result was fast, but bitter. Desiderio Pavoni, who bought Bezzera's patent, experimented with temperatures and landed at the 192F standard for modern machines. The Victoria Arudino models will blow your mind.
 |
| Exhibit A |
1. The Kitchenaid
Invented 1908, the H-5 home model came around in 1919. According to KitchenAid,
"...all stand mixer attachments will fit any KitchenAid Stand Mixer, including the original." This means that theoretically, one could find an original H-5 and put it to use.
 |
| The H-5, according to DecoDan.com it sold for $189.50 in 1915, no attachments! |
Oh, well, one can always dream, can't they?
Category:
gadgets,
Steampunk,
the Edwardians,
the Victorians
3
comments
